


Pesona Tradisi Hanfu: Estetika Klasik yang Kembali Mendunia
Bayangkan Anda sedang berjalan di tengah keramaian distrik perbelanjaan modern yang penuh dengan lampu neon dan gedung pencakar langit, namun…

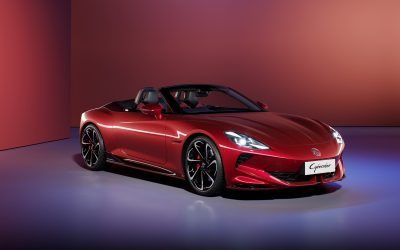
MG Cyberster: Mobil Listrik 2 Pintu yang Memadukan Eleganitas
Dunia otomotif global sedang mengalami pergeseran besar ke arah elektrifikasi, namun jarang sekali kita melihat sebuah kendaraan yang mampu memicu…

Huawei Watch Fit 5 yang Membawa Gaya Hidup Lebih Cerdas dan Dinamis
Huawei Watch Fit 5 hadir sebagai bagian dari perubahan gaya hidup modern yang semakin mengandalkan teknologi dalam aktivitas harian. Perangkat…

DJI Osmo Pocket 4: Kamera Gimbal Kecil yang Mengubah Cara Kita Merekam Dunia
DJI Osmo Pocket 4 hadir sebagai sebuah perangkat yang membawa pengalaman merekam ke arah yang lebih sederhana namun tetap terasa…

Cara Pasang E-Materai yang Benar, Praktis, dan Anti Ribet untuk Dokumen Digital Kamu
Di tengah perkembangan Cara Pasang E-Materai layanan digital, banyak orang mulai beralih ke dokumen elektronik untuk berbagai keperluan penting. Oleh…

Nasi bakar teri Daun Pisang Pesona yang Selalu Menggoda
Nasi bakar teri Sejak pertama kali mencium aroma dari hidangan ini, banyak orang langsung merasa terpikat oleh karakter khasnya. Nasi…

Tahu Asam Manis: Sajian Sederhana yang Diam-Diam Bikin Rindu Setiap Suapan
Sejujurnya, saya tidak pernah menyangka kalau Tahu Asam Manis bisa menjadi salah satu menu yang begitu sering saya rindukan. Awalnya,…

Sup Asparagus Kepiting: Kehangatan Lembut yang Menggugah Selera dan Kenangan
Sup Asparagus Kepiting selalu menghadirkan sensasi hangat yang menenangkan sejak suapan pertama. Hidangan ini tidak hanya memanjakan lidah, tetapi juga…

Eksplorasi Kelezatan Roti Kaya Bakar yang Legendaris
Dunia kuliner selalu punya cara untuk membawa kita kembali ke masa lalu, dan tidak ada yang melakukannya sebaik roti kaya…

Menjaga Asa Kehidupan di Habitat Asli Orangutan Infant
Dunia konservasi selalu memiliki cerita yang menyentuh hati, terutama saat kita berbicara tentang masa depan primata besar kebanggaan Indonesia. Di…